This idea is a conglomeration of a bunch of things I've seen recently on blogs, etc.: this quilt pattern from Carolina Patchworks, these stashbuster blocks from Little Miss Shabby, and this block, which is actually what started the ball rolling in my mind, from my friend Emily from my modern quilt guild. I told her my quilt idea at our last meeting and asked her if I could use her block as a starting point, and she actually came up with the ingenious idea that will simplify combining all 12 blocks in the end.
On to the "directions"--
Your fabric packages contain 4.5ish (some people only got 4 as I ran out of fabric!) strips of light blue solid, 2.5" x WOF, plus a piece 4.5" x ~20" that you may or may not need to use. I also sent about 40 different 2.5" squares to each person (hence the delay in mailing...it took *forever* to cut them all!).
I also included a small (13x13) sheet of graph paper for designing your block. When I went to make my sample block, though, I realized that this was much too big...nearly twice the size of two "regular" blocks, I hadn't sent enough of the blue, and plus it was just huge and kind of overwhelming. I retooled things a bit and I think what I've come up with is much more manageable.
Here's the layout of the whole quilt (click on the photo to see all 12 blocks).

I'm asking each person to design and then make one of the red rectangles, as identified by your name. These are 7 squares by 11 squares, or 14" x 22" (just a smidge bigger than 2 12"x12" blocks would be...308 square inches rather than 288. The spaces between each will be the sashing that I'll add in once I've gotten all the blocks back. The white squares will be more of the blue solid, and the red squares represent the spots where I'll use a 2.5" square of a print to connect the blocks. A google search for "free graph paper" will pop a bunch of sites, though for something so small it might be easier to just draw your own grid for planning out your design. I also included a copy of the quilt design without names at the very bottom of this post.
The look I'm going for is kind of a Pac-Man effect...as if he traveled onto the quilt on that red square the upper left above Tracy's block, and then meandered over the whole thing, exiting at the bottom right from Tami's. To achieve this, there are a couple of guidelines:
- please start and finish your design by including a print square directly adjacent to (not diagonal from) each of the red squares just outside of your block. Please leave at least one of the border squares on either side of that "entry" square empty (which means it will be the solid blue in the finished block) so that you'll create the effect of a path rather than a completed shape. For example, Tami would include a print square fourth from the right in the bottom row of her block, but would leave either the third or fifth from the right empty (solid blue).
- please make sure to leave a space between each row (no two rows of print just next to each other)...your path will meander and twist, but always with solid blue between the lines of print.
- feel free to use the border squares, as the sashing will create space between your block and the others around it.
- I've included almost enough 2.5" print squares, but don't feel obligated to use just the ones I sent. I would really like it if you included some of your own fabrics. I'm going for more brown than gray, more cool than warm, and prefer modern fabrics to anything novelty, country, or batik.
- if you would also include a loose square--yours or mine--onto which you've written your initials in pencil or water-soluble marker, that would be terrific; I'm going to embroider them and incorporate them into the back.
- I'll gladly accept whatever fabrics you don't use for the sashing and back, but if there's a square or two that you love and want, by all means, keep them.


I ended up going with the second one, and here's a progress shot (this is most of the bottom three rows). I'll finish the block today, I hope, and will post a photo when it's done.
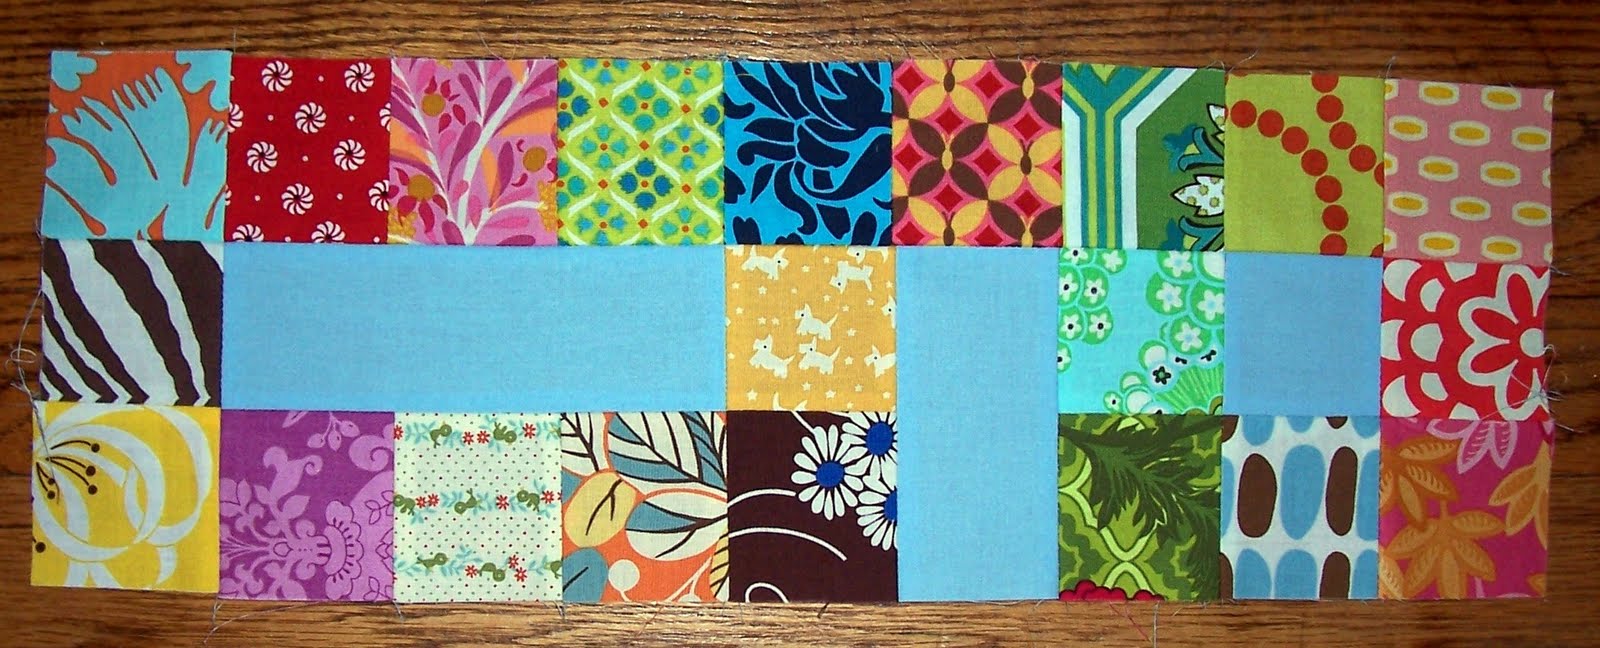
A couple of things that I found worked well to keep the piecing easy and the block square--I tried to work with small units and join those rather than strips (too easy, for me anyway, to find myself "off" with my seams by the end of a row, and then just pinned each intersection so that everything lines up fairly well. I also made sure to measure my 1/4" seam on my (old) machine, as I've had various kinds of trouble getting blocks to size out and this block will be most successful if things line up well. Maybe some of the more seasoned quilters in our group will have some more tips for keeping everything aligned and straight.
Thank you for reading my novel...I really think it will take about as long to actually make the block as it did to read all of this! Hopefully, some of you should start receiving your fabric today or tomorrow. Again, since I was so late in mailing these out, take your time...I have plenty to keep me busy until everyone gets a chance to make them.
Thank you so much! Please let me know if you have any questions.
blank layout:


Much of my progress shot was cut off...it's also in our flickr group if you want to see the whole thing.
ReplyDeleteThis is going to be super. What wonderful quilts. Everyone must click on the links, too good to pass up. I am sure that I will have fun doing this. I like it a lot! Enough to do one for myself too.
ReplyDeleteWow - this is amazing.
ReplyDeleteWow - this is really fun! Can't wait to get my fabric and get started.
ReplyDeleteIt looks like it was quite a challenge getting this all figured out and organized!